Tuesday, 26 April 2011

More for the men

Back to work today, but a short week – hurray!

A few more examples of the new digi stamps for my last class. Hopefully they will give you some ideas as Fathers will soon be upon us.

This first one is for the ‘Sporty Mini Type’

cards 022 All of the cars shown have been coloured with copics. The mini has been cut out and placed over the edge of the top of the card.

cards 023 You can personalize any of the cars by adding the recipients name or age etc to the number plate.

The ‘Racer Type’

cards 018   

Glossy accents added to the lights.

cards 021

cards 025

The 60’s Type.

cards 019cards 020and finally just to say ‘Hi’

cards 015cards 016I am working on another version of this mini which I will show later in the week.

Thanks for stopping by.

Gayle x     

Monday, 25 April 2011

A quick post …..

I hope everyone is enjoying the last bit of the Easter break. What brilliant weather we have had for the WHOLE weekend. I think that going by past years this might have been our summer! I hope I’m wrong.

Anyway just a few pics of the last class I taught with my new digis. I drew them with the men in our lives in mind but can easily be adapted for other occasions and made a bit more feminine.

This first one is an old vintage car and made into an easel card. The trunk has been 3D and some ribbon coloured with a black copic pen for the straps.

cards 014

cards 012I adapted the same image to make a wedding card.

cards 011The cars were water coloured using distress pads .

cards 009I cut out the back window and added a piece of acetate  behind, stamped some tiny flowers and added those behind the acetate and then used some silicone  glue to re attach the inside part of the car.


cards 008I used some rolled card painted silver for the tin cans and tied them to the car bumper.

You could alter the colours used to go with the brides wedding colours.

Well that’s all for today. Some more tomorrow.

Thanks for stopping by.

Gayle x

Monday, 18 April 2011

My little Boy ……………..

is no longer little, he has reached the grand old age of 18!  I can’t believe how quickly the years have gone by. It doesn’t seem 5 minutes since he was a babe in arms.

Last Monday was his actual birthday and he asked if he could have a few friends round for a BBQ. When I got home there were about 30 occupying my house! I must admit there wasn’t any trouble. The drink was flowing rather freely and the black sacks were filling up very quickly with the cans and bottles but thankfully no one was ill. I can’t deal with sick!

Saturday we had a family and friends get together at my friends Natalie and Tony’s  Pub The Brickmakers Arms in Gillingham and a great evening was had by all. I would like to thank them for letting us hold the party there and Natalie for the use of her kitchen so I could prepare all of the food.

So for Daniels card. I decided to theme it on his two favourite pastimes – the Xbox and Rollerblading and this what I came up with.

cards 027I drew out one of his skates and the Xbox and coloured them in with Copics.

cards 028The buckle on the boot and the controls on the handset were highlighted with Glossy Accents.

cards 031The lace was a piece of string coloured with a blue Copic marker .

cards 034I cut out the ‘18 ‘ in card and covered with a black raised dotty paper, punched some holes and laced with black string coloured with a black Copic marker.

cards 033I must admit I was pleased with the result and Daniel and his mates were impressed. Makes it all worth while.

I would also like to show the card that Natalie made for him. She is really getting into Tim Holtz at the moment and going great guns.

april 2011 021I love the mans legs stamp she has used.  

april 2011 022The background stamping and distressing is fantastic Natalie.
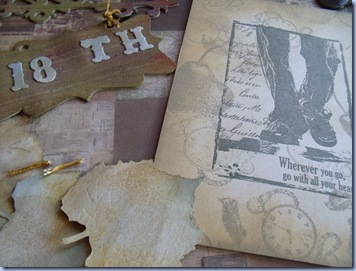
april 2011 023A fantastic card. Well done Natalie and Daniel loved it.

That’s all for tonight.

Thanks for stopping by.

Gayle x

Wednesday, 6 April 2011

Yellow………………………

is the theme of this weeks card challenge at Scrapbook Sisters.

I had to have a go with my Tim Holtz dies. Scrapbook Sisters is receiving a lot of deliveries in the shop now full of  Tims goodies.

cards 092I have used his new dress form die with cotton reel and buttons and his old faithful the tattered florals. The dress form, reel and buttons were cut from Grunge paper and inked with distress inks. Another form was cut from patterned paper and the stand section cut off and stamped over with a grid stamp.

cards 088 

cards 086

The flowers were cut from patterned paper. I wanted a bronze embellishment to go in the centres of the flowers but couldn’t find anything in my stash so I resorted to swiping a silver jewellery finding across a Versamark ink pad  and dipping it into bronze embossing powder and heating up. 

cards 089

The smaller petals of the large  flower were formed by cutting  two tiny scalloped  circles from a nestibility ( didn’t have a scalloped punch). Misted with water to dampen down and then scrunched up. When the paper dries it retains its shape and hardens off a little.

cards 087

cards 097The sentiment stamped onto the card and over stamped with the grid stamp. I thoroughly enjoyed making this card as I love all things Tim! I love making dimensional cards. I don’t seem to be able to create anything flat now that I’m happy with.

Thanks for stopping by and don’t forget to have a go and enter the challenge. 

Gayle x

Tuesday, 5 April 2011

Leaving card

Hi everyone

Tonight I am sharing a card I made on Sunday for a work colleague who is leaving us on Friday.

Pondered for along while as to what to do and so decided to go through my wood mounted stamps(there are many!) and decided on yes a Butterfly.

cards 100I decided on an easel style card. I stamped the image and coloured with copics.


cards 107 

The pictures were taken early in the morning so the light wasn’t particularly good but the background paper is a dark chocolate with white spots.

cards 108Distress stickles added in areas of the image. The butterfly was then stamped onto acetate and cut out and layered over the main image.

cards 112cards 109

I’m in the process of making a card for my sons birthday on Monday. I can’t believe he will be 18!   They grow up all too fast. His loves are Roller Blading and of course the Xbox so I’m trying to incorporate them into a special card for him. If I succeed I’ll show it next week.

Until tomorrow when I’ll be posting this weeks card challenge from Scrapbook Sisters.

Nite nite

Gayle x

Wednesday, 30 March 2011

Card Challenge

Sorry its been a while but not enough hours in the day as usual. Decided tonight to take half an hour out and do a long over due post - Scrapbook Sisters latest challenge.

This weeks theme is Mothers Day or for Someone special. I did cheat a bit this week as I have used the birthday card I made for Karen at Scrapbook Sisters. It was her birthday yesterday.

cards 075The beautiful  image is a stamp I have had for a few years that was hidden away until I re-discovered it at the weekend. I bet I’m not the only one who finds things that they’ve long forgotten about.

She is coloured with copics. I used a nestabilities oval die cutting into the legs part of the image so she is standing outside of the oval.


cards 078

The organza ribbon was coloured with the red copic and heated with the heat gun until it starts to shrivel up. Be careful if you try this  as it is best done with a heat gun with a slow speed- 2 speed gun on the lowest setting, otherwise it will burn and melt. I then cut some slits in the card and threaded the ribbon through to create a shawl.

cards 081The background paper is from a K&Co paper stack. The roses were cut from the same paper and moulded to give a 3D effect and attached with silicone. Hope you like it. If you haven't entered the challenge yet have a go.

A bit more prep now for my next card class in a couple of weeks time ‘one for the boys’. Hopefully these cards should help make life a little easier when making for the male species.

Thanks for stopping by.

Gayle x

Tuesday, 8 March 2011

A finished class project.

This is a card holder class that I attended and contributed to at Scrapbook Sisters before christmas. I designed a range of digi stamps of which some were included in the kits for the cards.

I finally finished the card holder for my sister for her birthday. I didn’t decorate the box as I was up against the clock to get a selection of cards made to go in the box.

jan 11 088jan 11 091It ended up slightly different to the class one. I had some metal letters in my stash that I stuck onto the front of the holder.

jan 11 090The following are some of the cards I made to go inside.

This first one was a magazine free stamp. The icing is sprinkled  with Glamour Dust but unfortunately doesn't show up in the photos. It looked really pretty in the flesh so to speak.

jan 11 115jan 11 107This is one of my digi stamps. The frame is so versatile as you can put text in the centre or a photo or use it in a scrapbook  page to highlight a particular photo.

jan 11 108The image was coloured with copics and accented with  Glossy accents   for a water droplet effect. Photos are a bit rubbish – sorry.

jan 11 118jan 11 119 I love this little bear in the bath. I think this was from a set of stamps that came free with a magazine.

I will post some more later this week.

Thanks for stopping by.

Gayle x